 Toolkit for Janitor AI
Get one complete path working first
You do not need to configure every section. Choose the outcome you want, then complete the matching setup below. The Home page in extension options shows your progress, and yellow Setup needed cards point to anything still missing.
-
1
Install and pin the extension.
Open extension options once so you can configure your providers.
-
2
Set up one capability.
Start with images, scene intelligence, or voice using the recipes below.
-
3
Open a JanitorAI chat.
The Toolkit flag appears at the top-right. Select it to open the in-page panel.
-
4
Send or open a message.
Toolkit reads the active chat locally and enables the relevant scene, cast, prompt, and voice controls.
I want images
Add an Image provider, then select it under Defaults.
Minimum setupI want scene-aware prompts
Add an LLM connection, a Scene analyzer, and a Prompt tagger.
Best image workflowI want voices
Add a TTS provider and a TTS helper, then assign voices in Cast.
Voice setupChat context moves through four visible stages
Toolkit keeps each stage separate so you can correct the story context without losing control of the final image.
Know which actions save text and which call the LLM
The scene is a compact description of the current story state. It is shared by Scene, Cast, and Generate, and updates live in an open Scene tab when the stored state changes.
Save override
Saves your exact scene text. It does not call the LLM or rewrite what you entered.
Refresh from messages
Sends unread chat messages to the scene analyzer. If there are none, Toolkit tells you the scene is already up to date.
Apply now
Sends your one-shot change request with the current scene and asks the analyzer to rewrite it immediately—even without new messages.
Reconcile scene with cast
Use this from Cast after changing a character's appearance or details. It explicitly brings those edits into the scene.
While an AI scene update is running, Toolkit shows an in-progress indicator, disables competing update actions, and refreshes the visible scene when the result arrives.
See the complete correction
Open the illustrated walkthrough to follow the change from the original scene to the corrected image.
Correct a scene detail before generating again Manual edit → prompt → corrected image Open walkthroughClose walkthrough
-
1
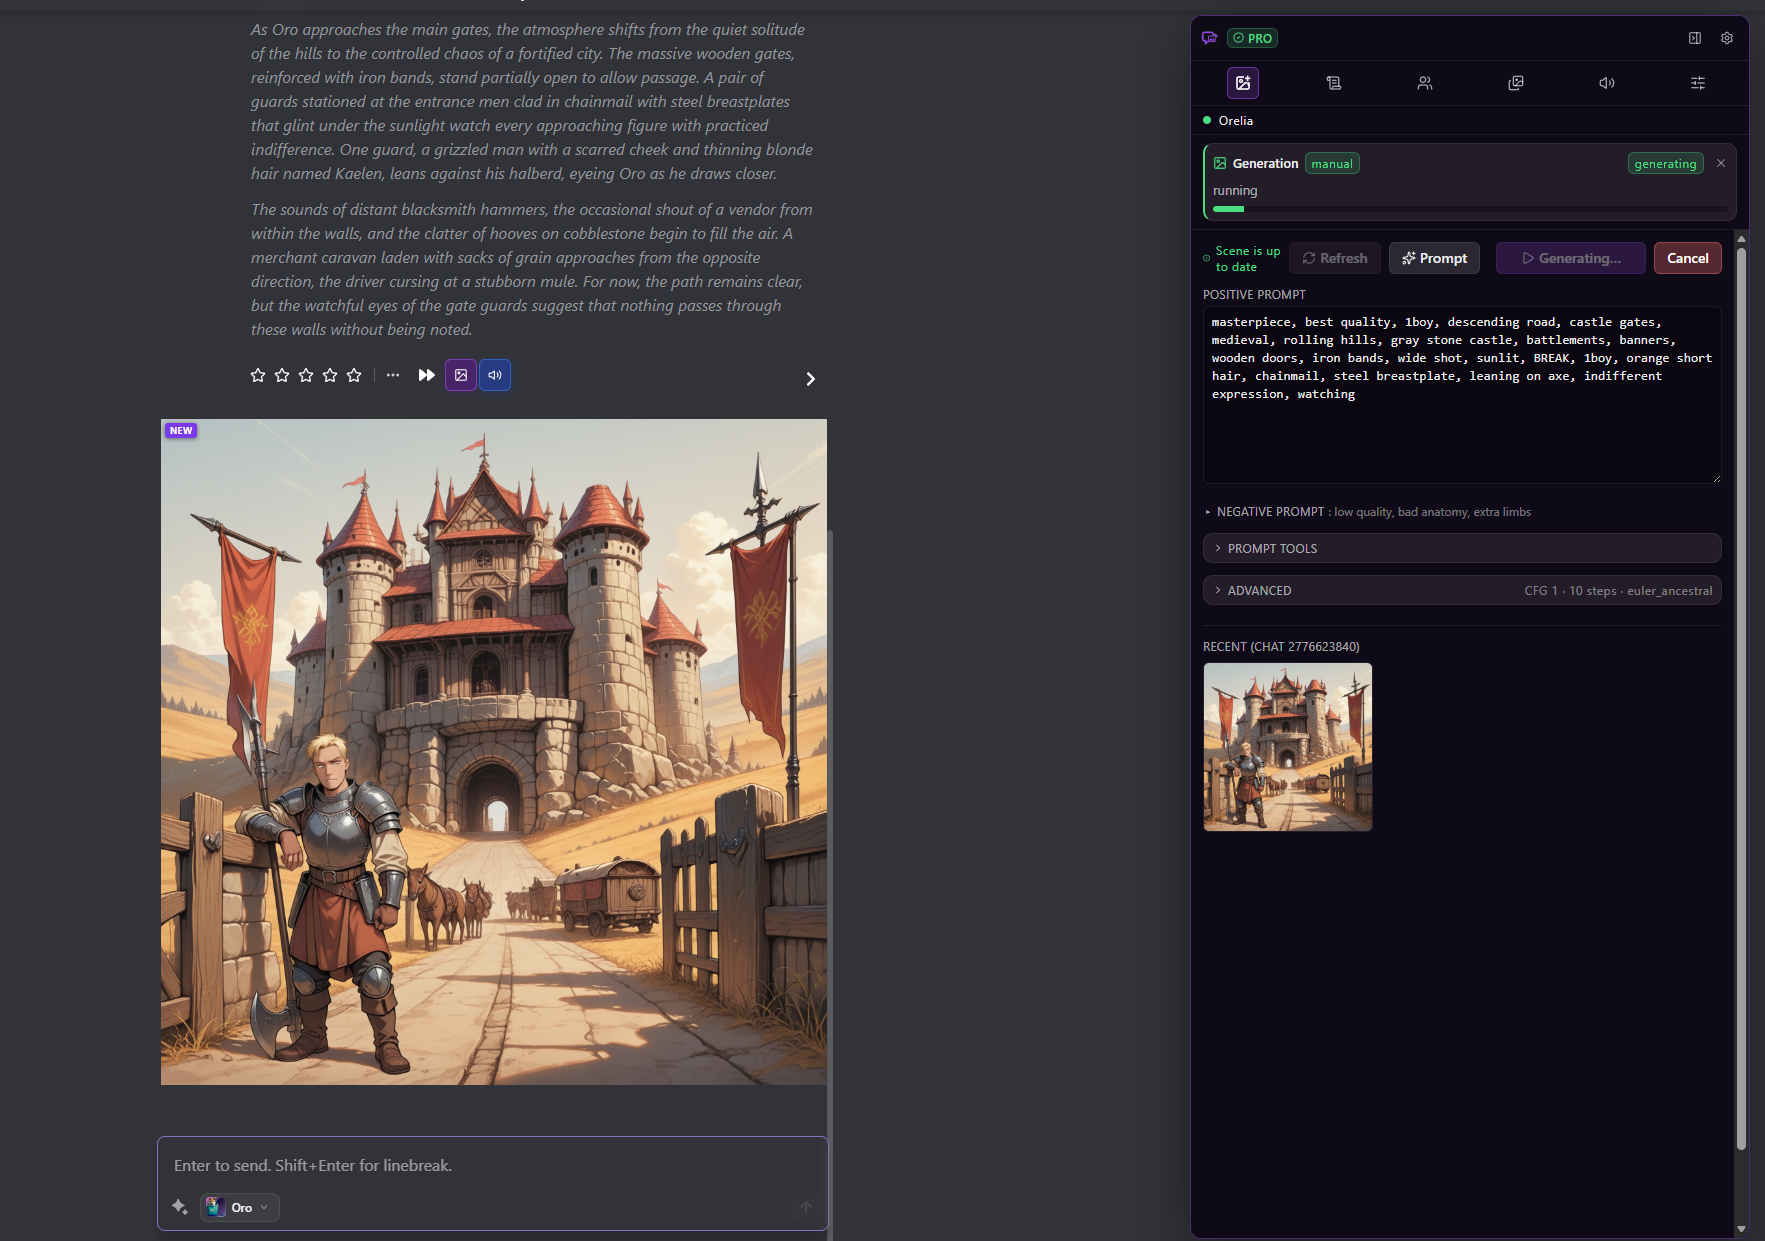
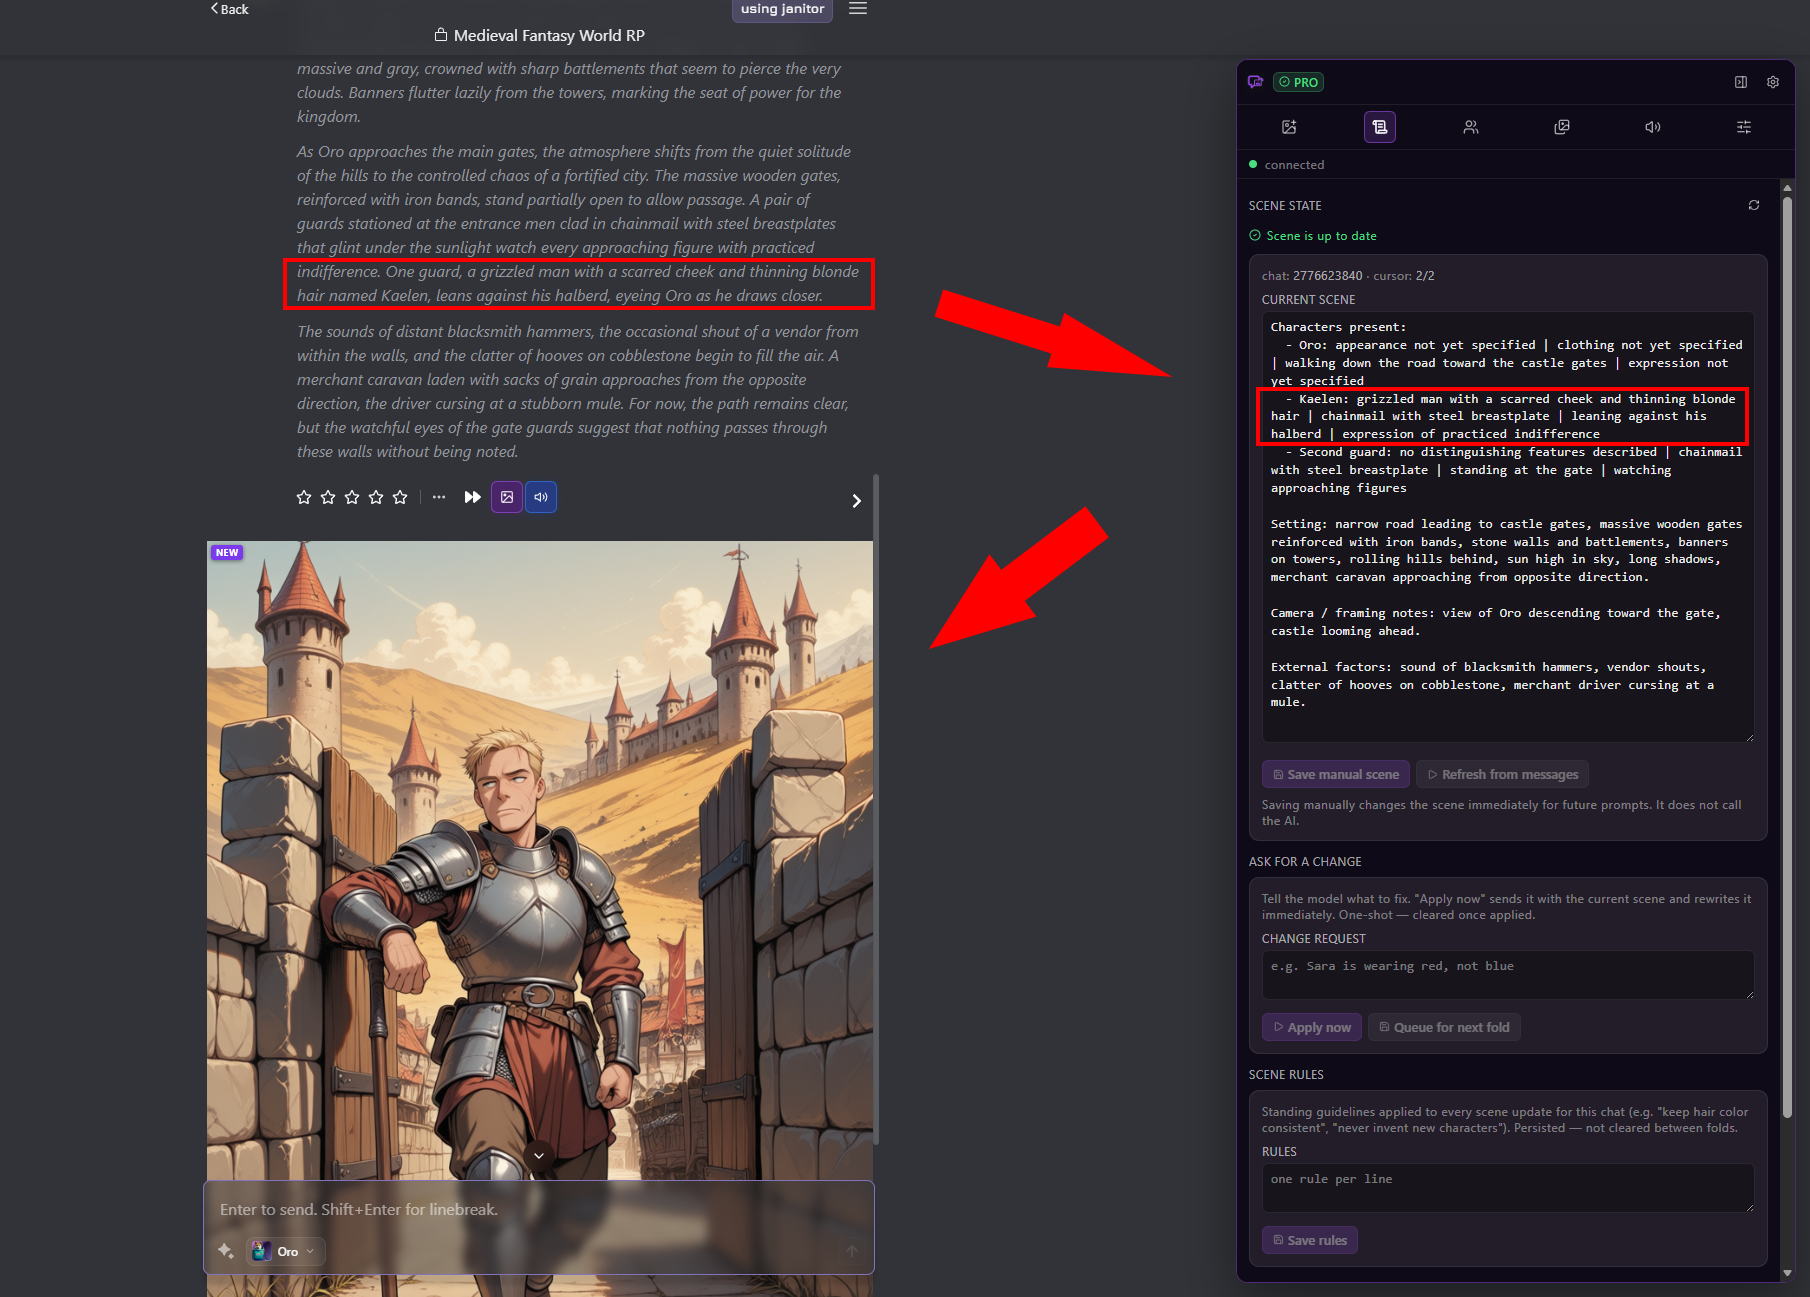
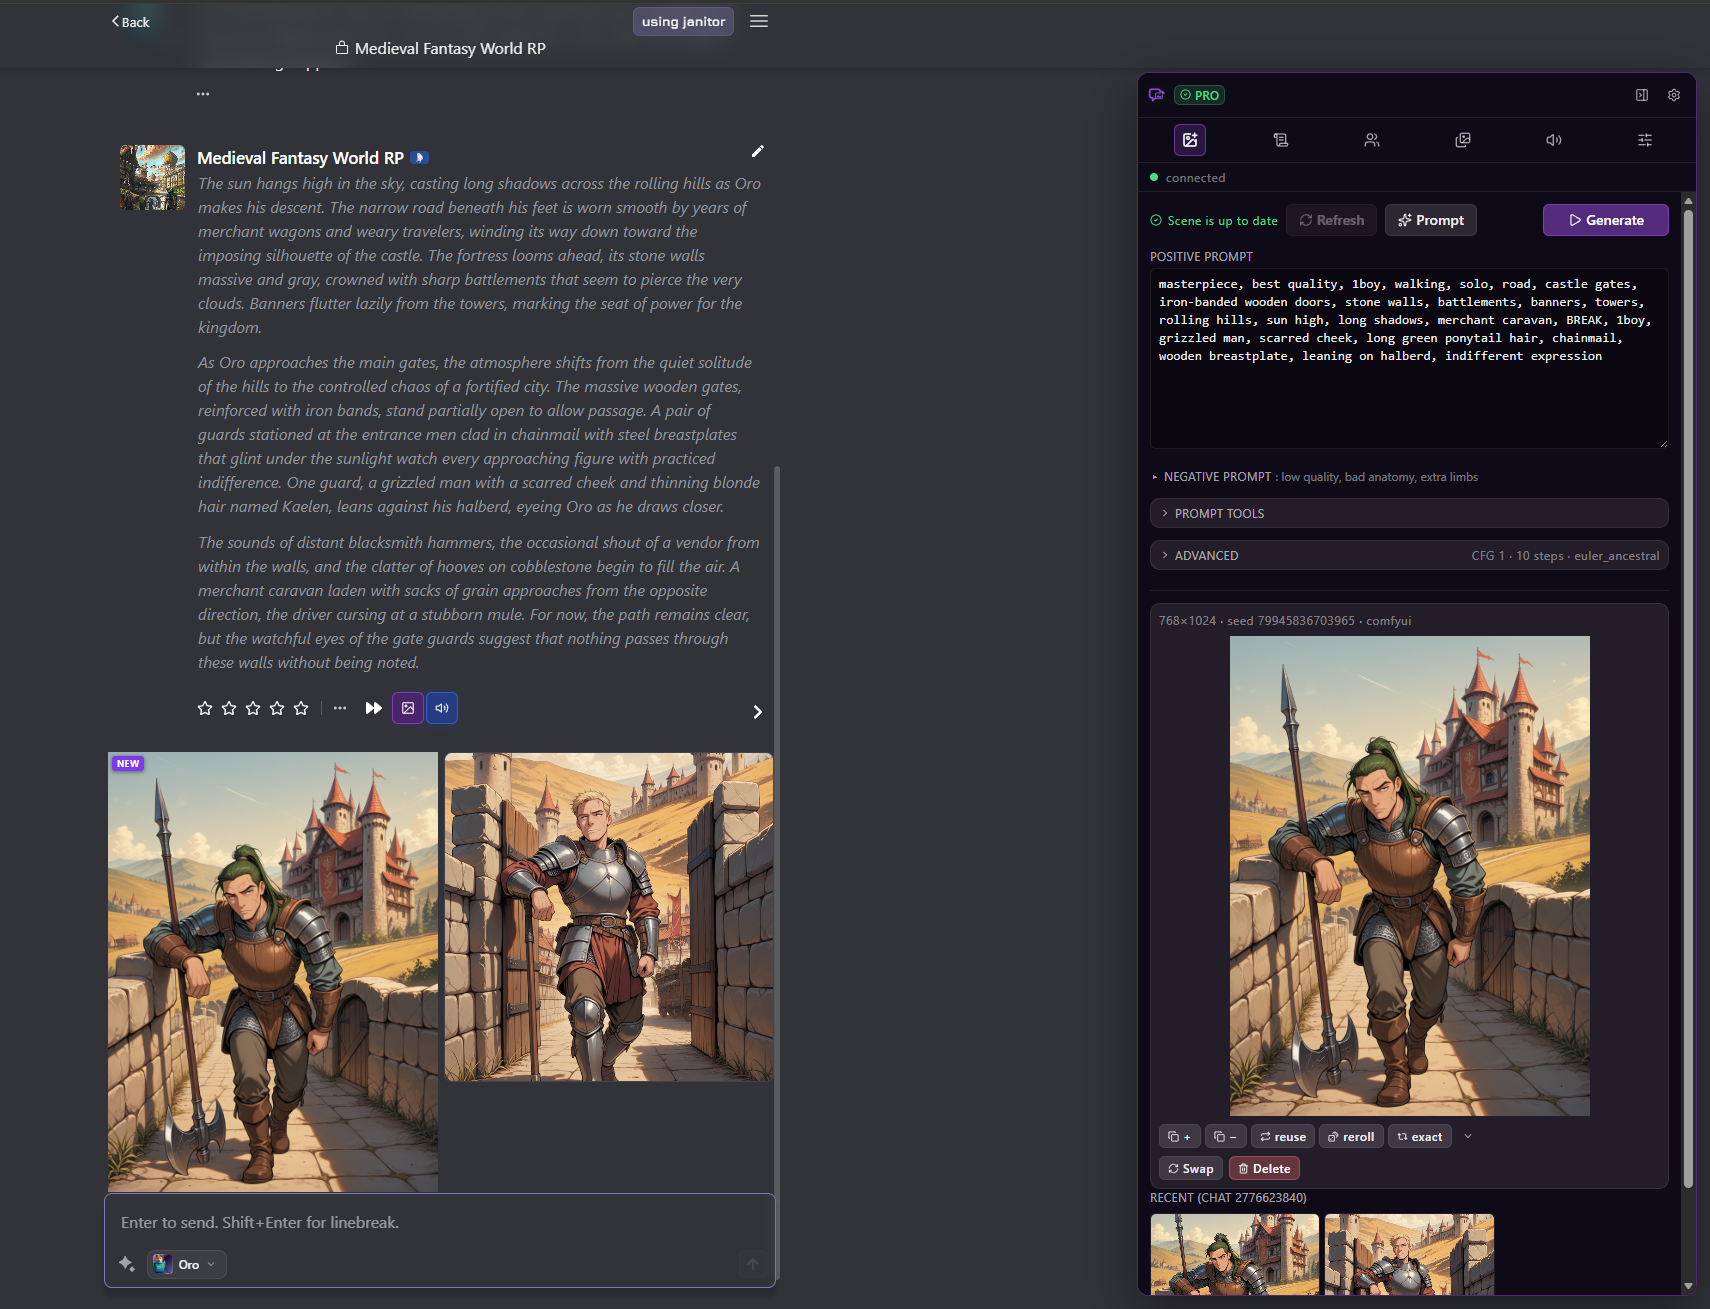
Characters appearance are inferred from the chat content. If you want to change something. Here, Kaelen’s hair match the scene appearance, but we want to change it.
-
2
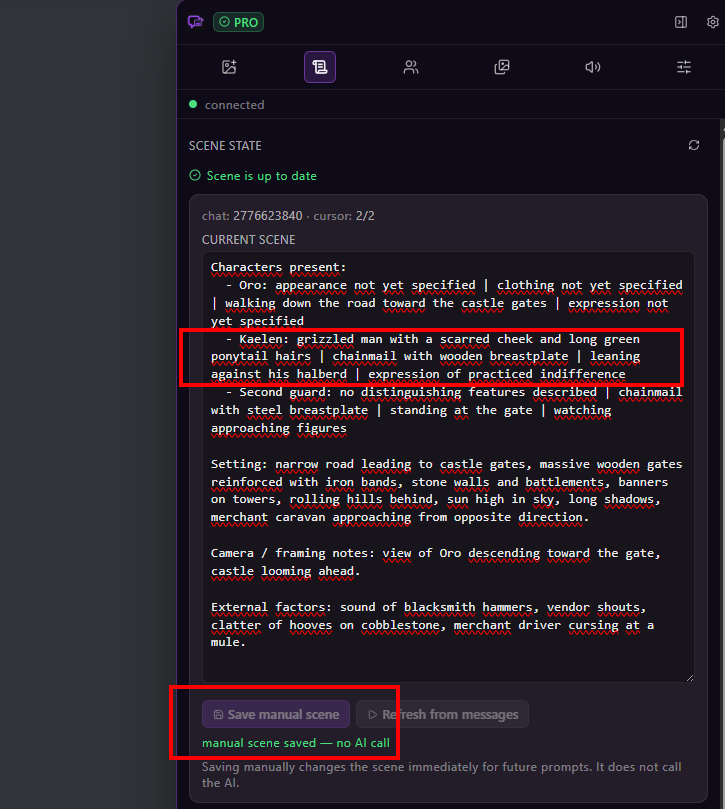
Edit and save the scene. Change the text directly and select Save manual scene. This stores the exact edit locally and makes no AI call. Also, from now on your changes take precedence over AI-generated content.
-
3
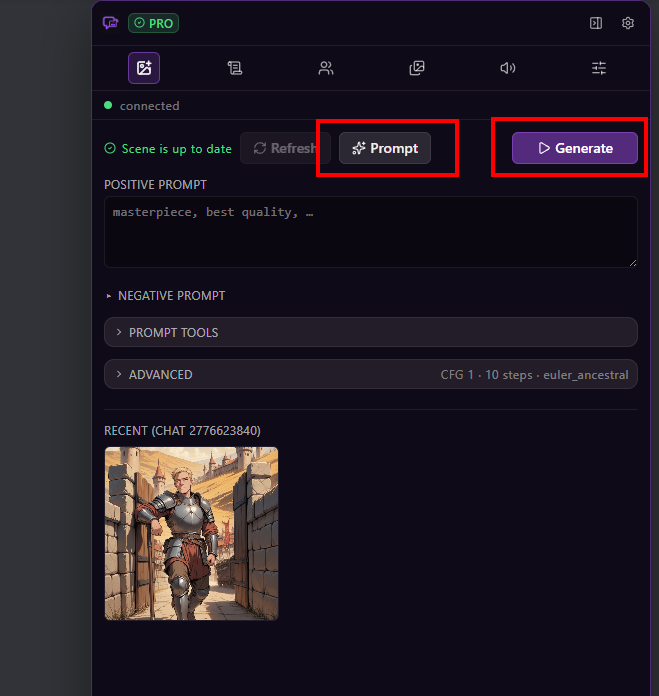
Rebuild the prompt. Return to Generate, select Prompt so the corrected scene becomes image tags, review them, then select Generate.
-
4
Check the new result. The rebuilt prompt now includes the corrected hair description, and the newly generated image reflects it.
Keep reusable character facts separate from the scene
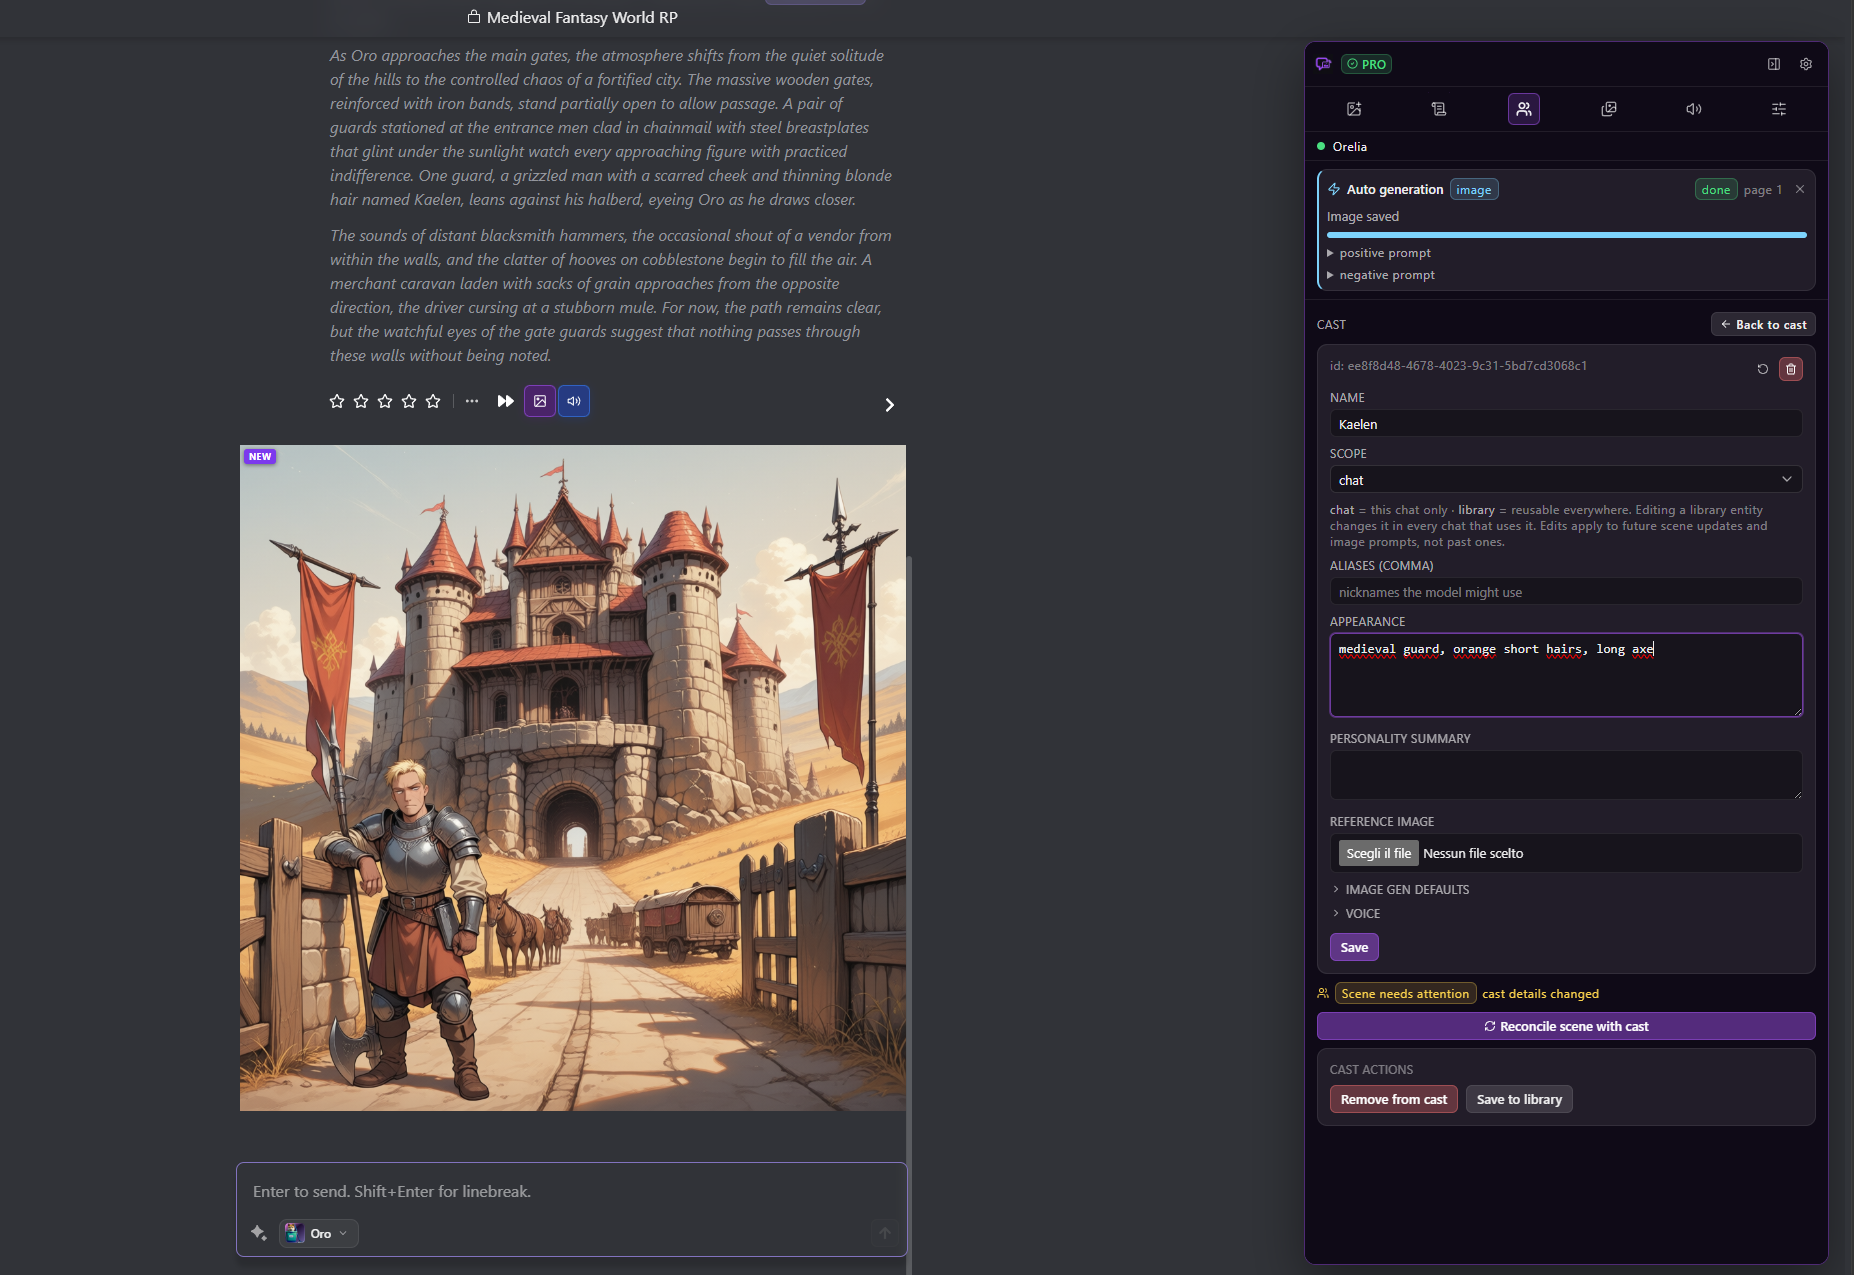
Cast stores character appearance, prompt details, triggers, reference images, and voice assignments. The scene describes what is happening now.
Recommended routine
- 1Edit and save the cast member.
- 2Look for the stale-scene notice.
- 3Select Reconcile scene with cast.
- 4Review the updated scene before generating.
Why it is explicit
Saving a character should never spend LLM tokens or unexpectedly rewrite your scene. Reconciliation happens only when you request it.
Follow the cast workflows
Each card opens a four-step visual guide with the exact controls used in the extension.
Add detected characters and correct their appearance Detection → cast edit → scene reconciliation Open walkthroughClose walkthrough
-
1
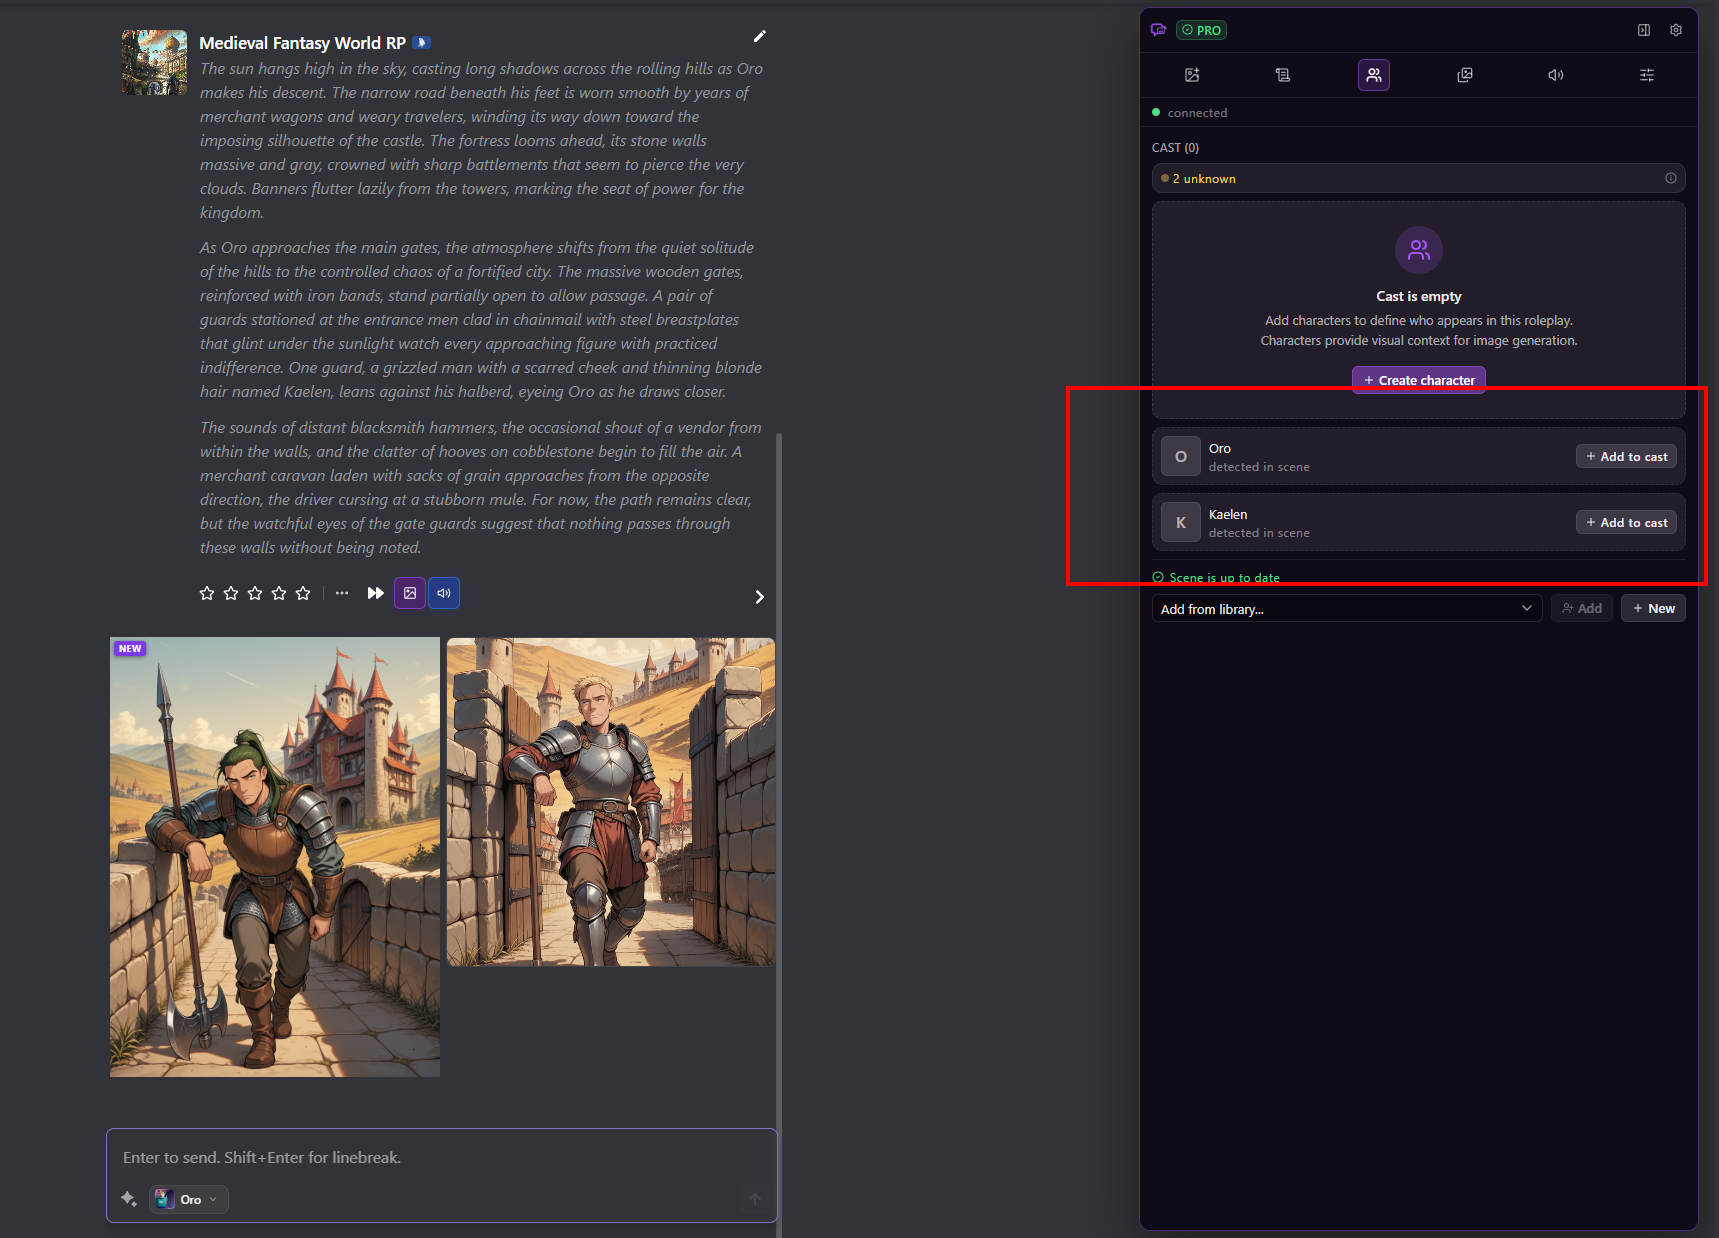
Add detected characters. Toolkit lists names found in the current scene below an empty cast. Select Add to cast for the characters whose details you want to control.
-
2
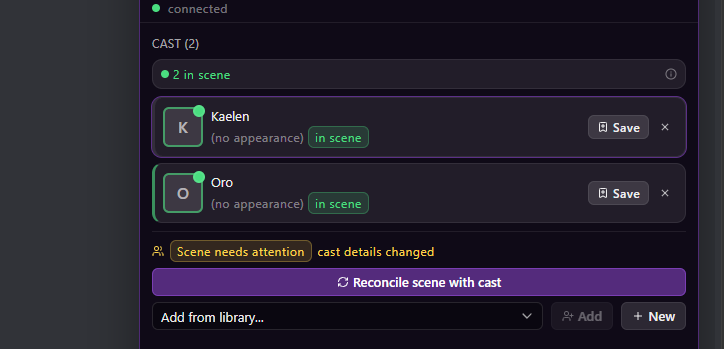
Notice the scene warning. Adding or saving cast details marks the scene as needing attention; it does not silently spend tokens or rewrite the scene.
-
3
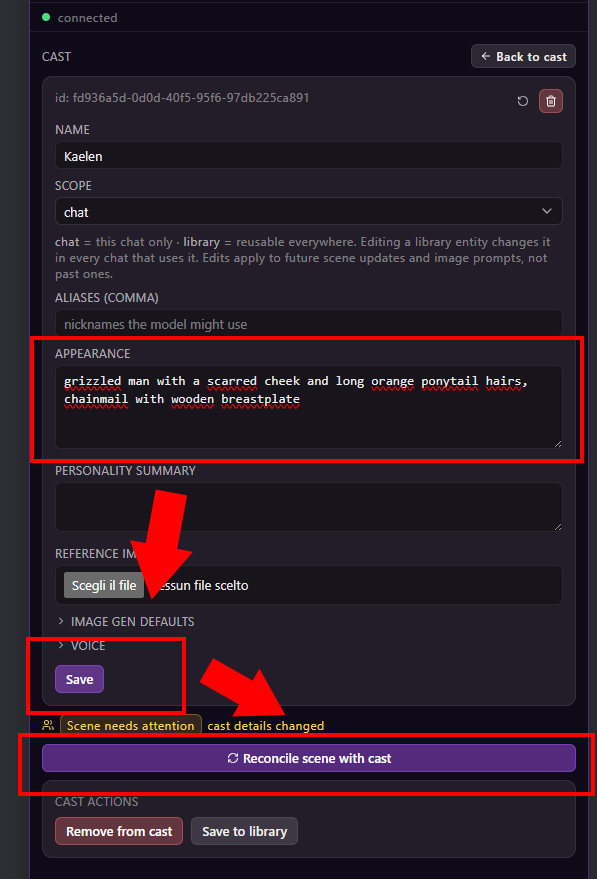
Save the canonical appearance, then reconcile. Edit the character, select Save, and use Reconcile scene with cast to replace stale appearance details in the running scene.
-
4
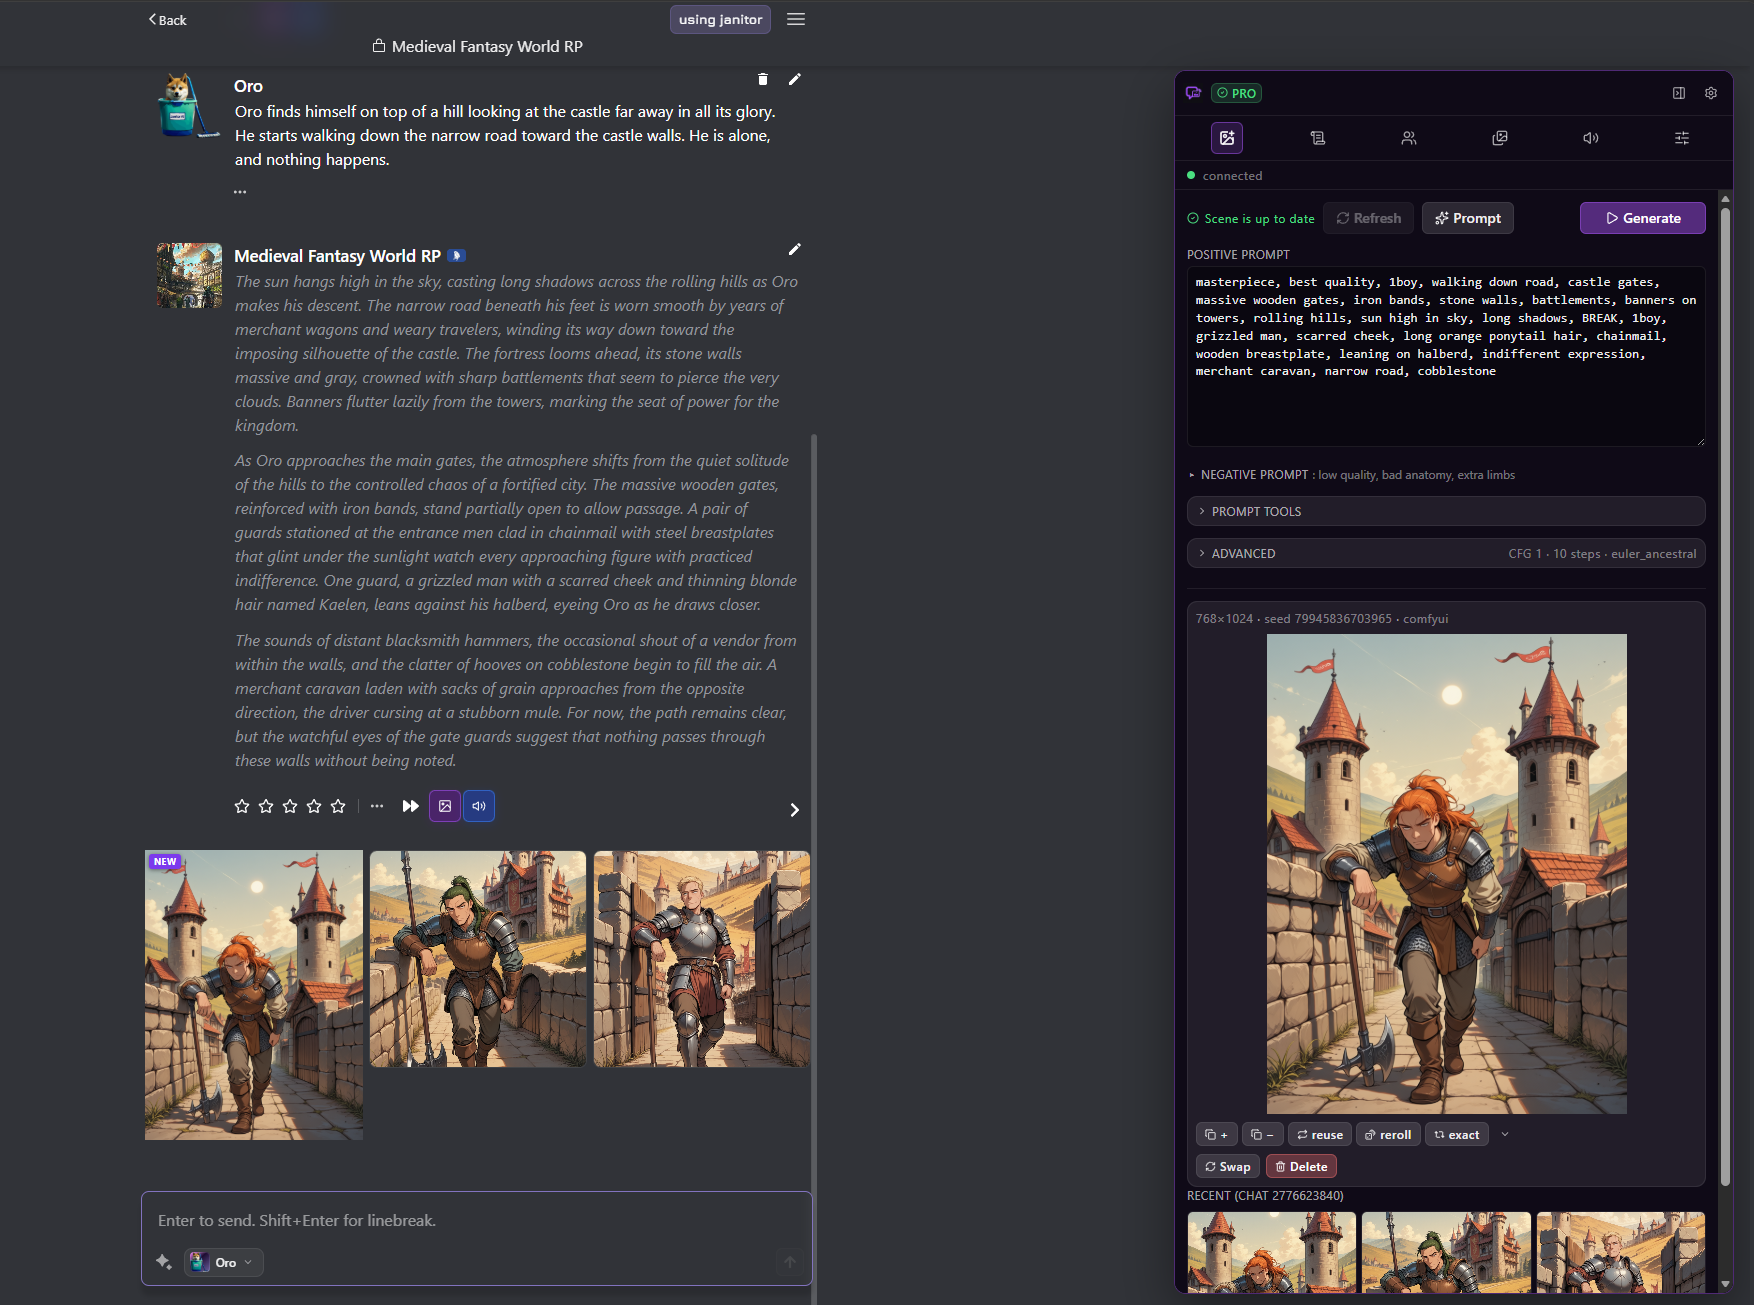
Build a fresh prompt. The prompt now uses the reconciled cast appearance, and subsequent generations keep that description in the visual context.
Reuse a library character in another chat Save once → add elsewhere → track scene presence Open walkthroughClose walkthrough
-
1
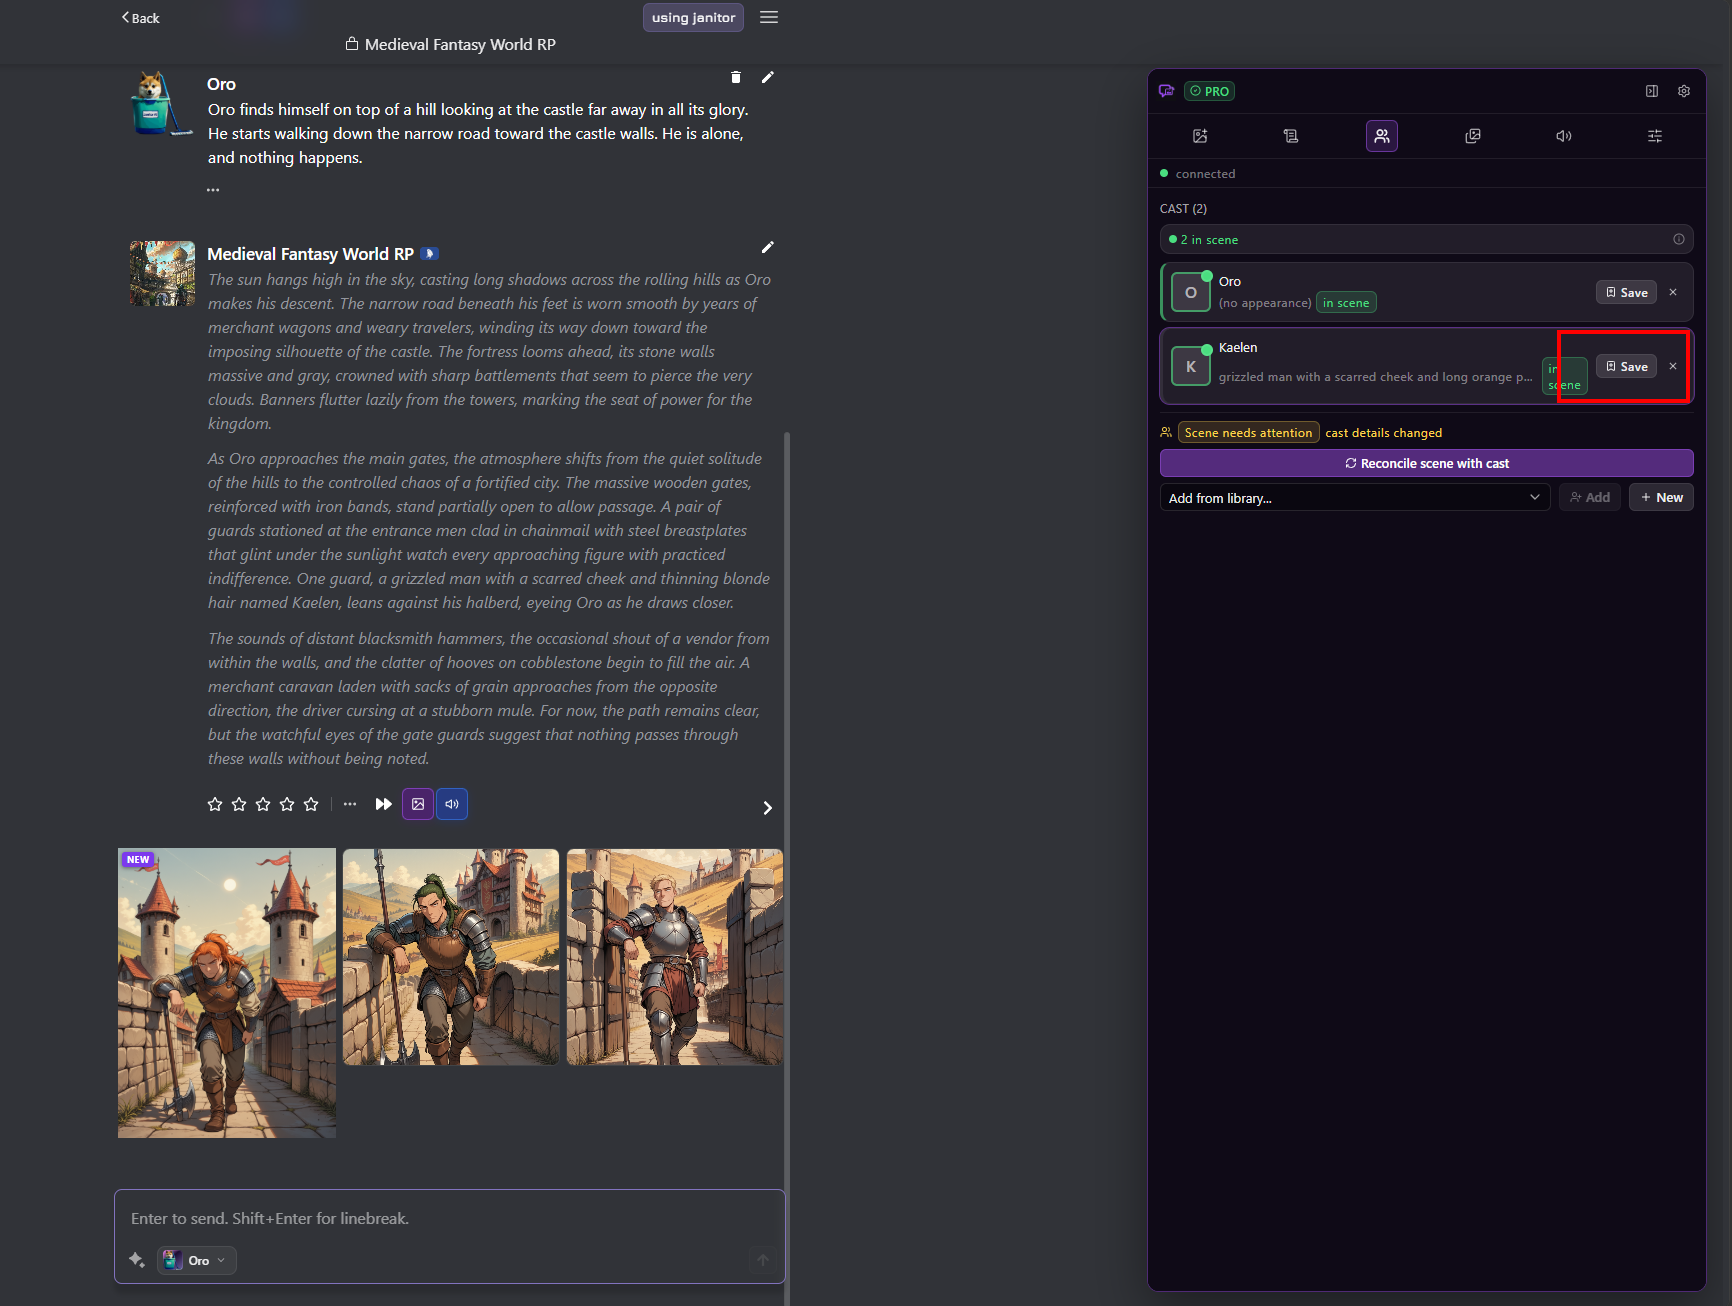
Save the character to the library. Use the save control on a cast member to make its canonical details reusable outside the current chat.
-
2
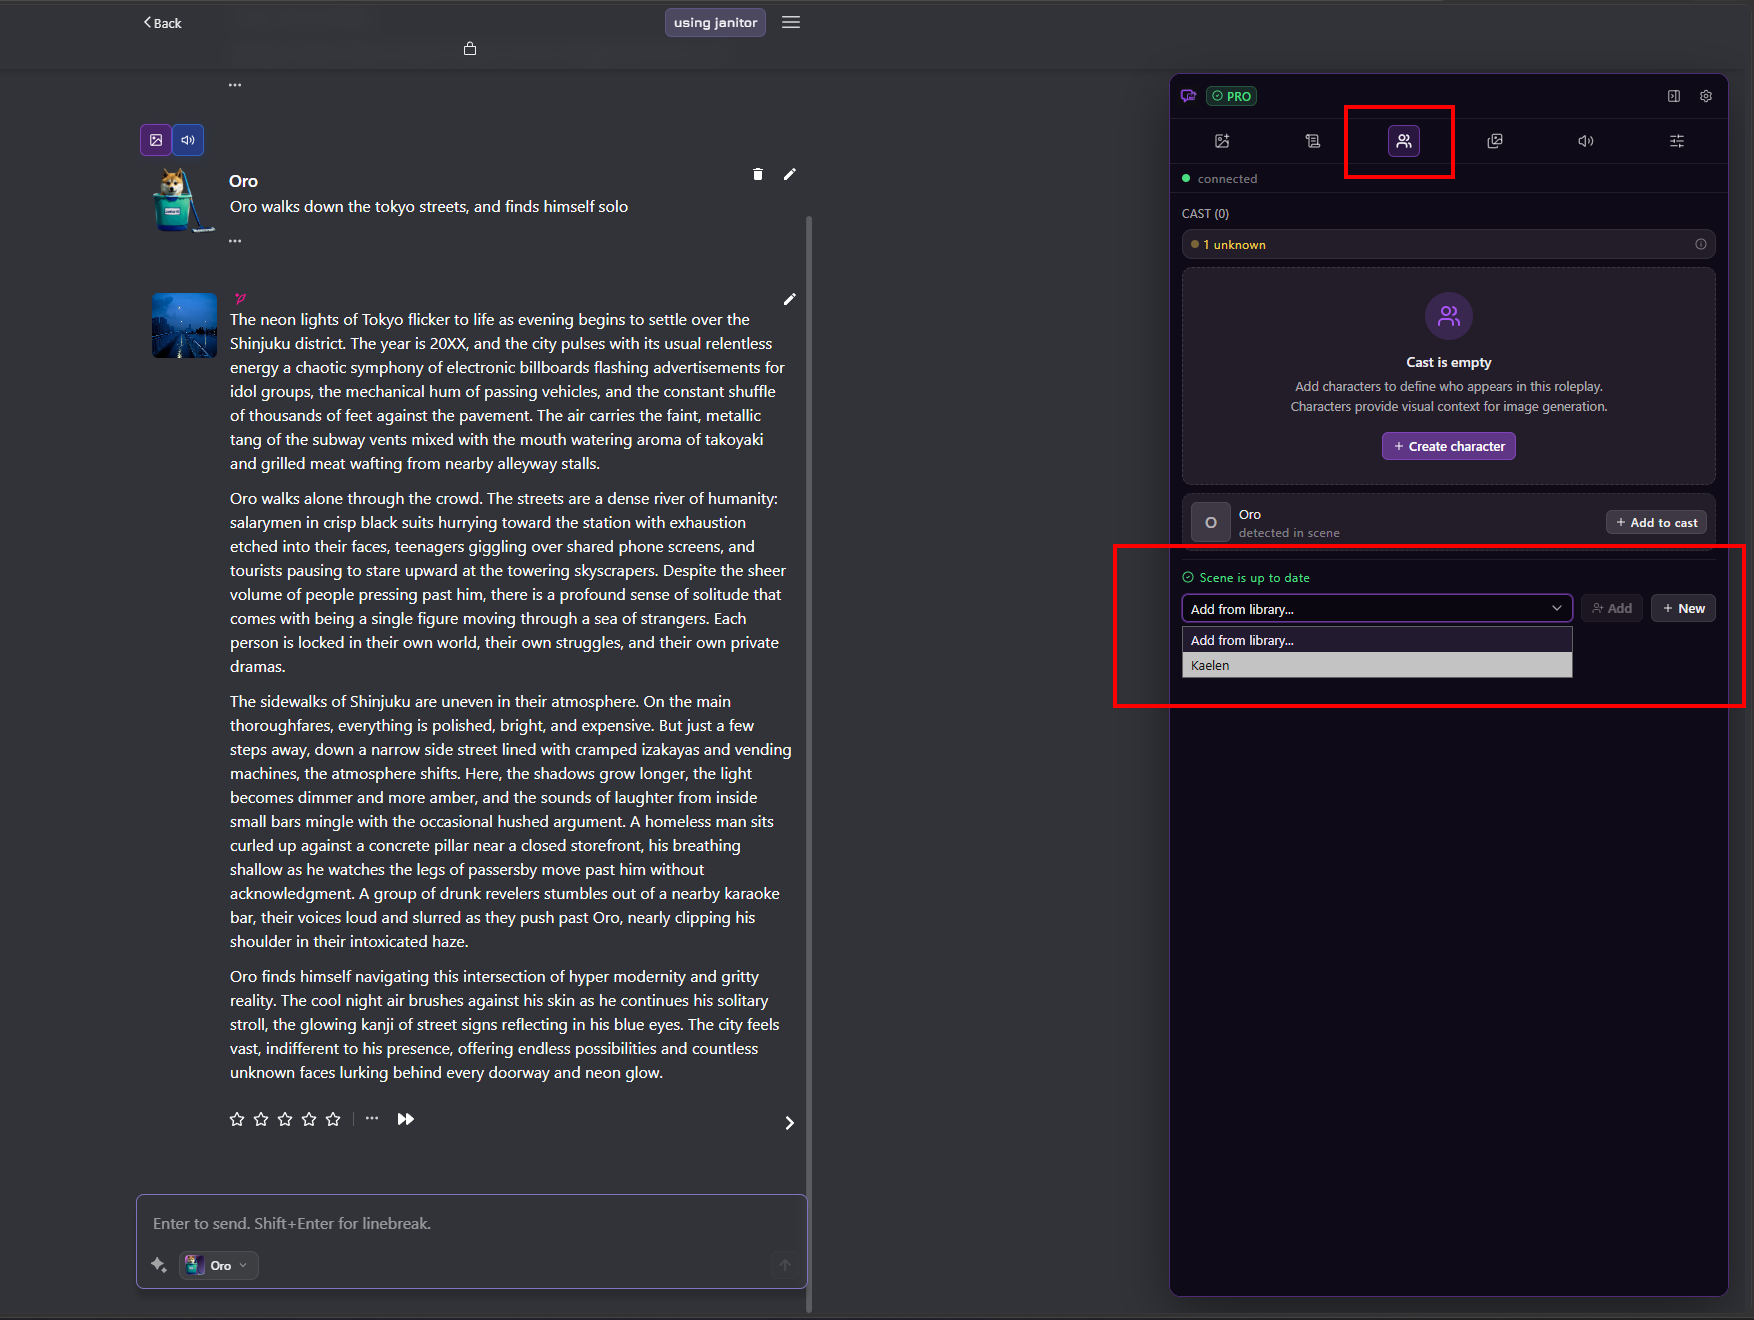
Add it from another chat. Open Cast in the destination chat, choose Kaelen under Add from library, and select Add.
-
3
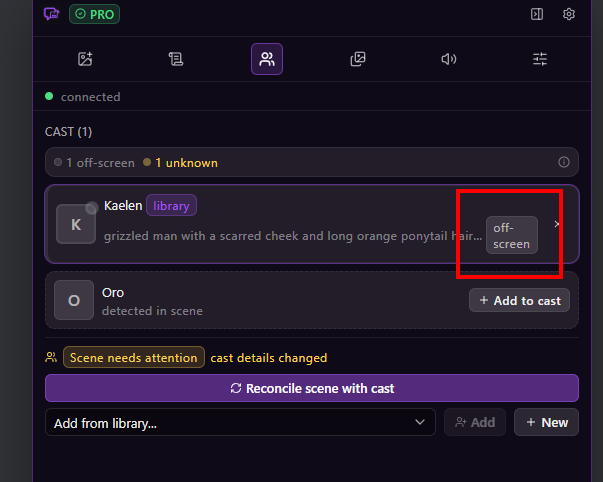
Off-screen is expected at first. A library character can belong to the cast without being present in the current scene. Toolkit marks that character off-screen until the story brings them in.
-
4
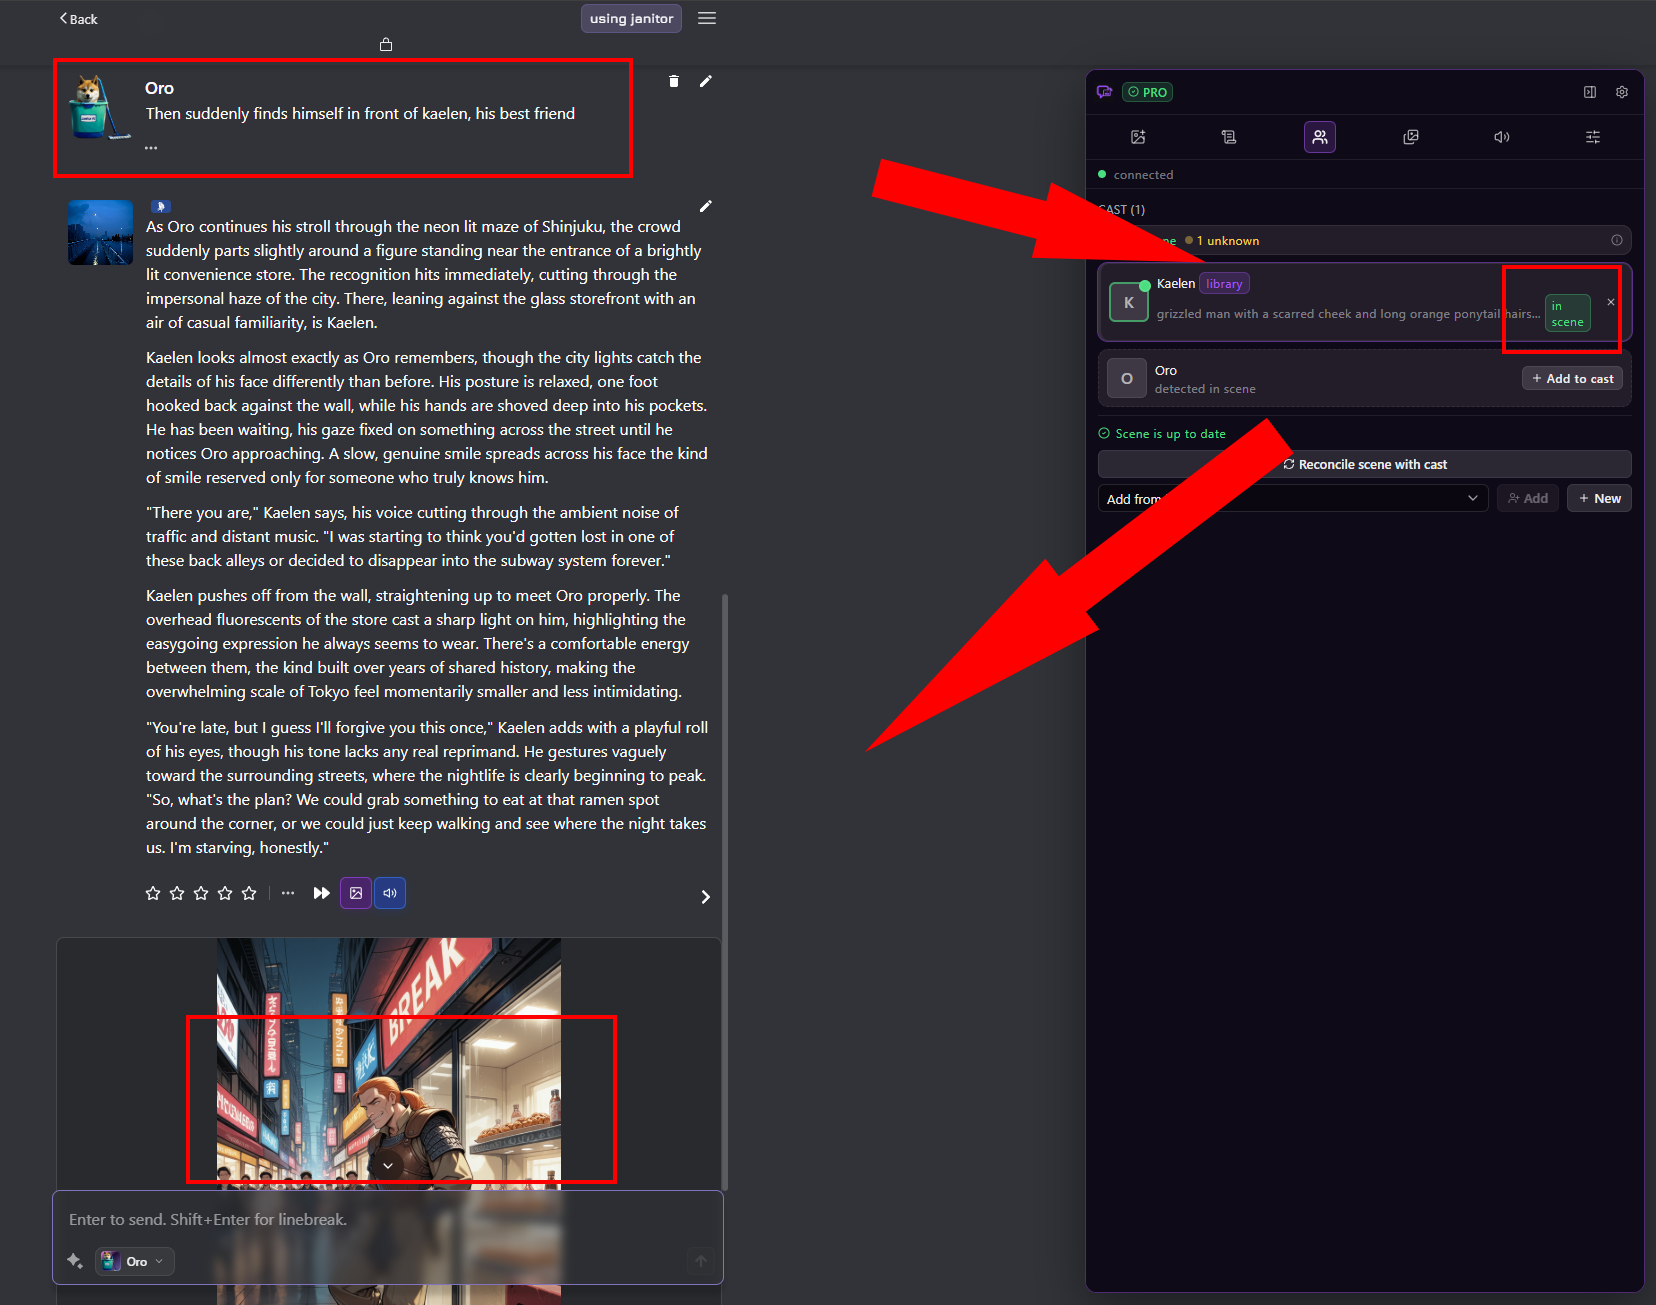
Presence follows the story. When a new message introduces Kaelen, the next scene update marks him in scene and makes his saved library details available to prompts.
Build, review, and generate without leaving the chat
-
1
Check scene freshness.
If a warning appears, refresh or reconcile before building the prompt.
-
2
Build prompt.
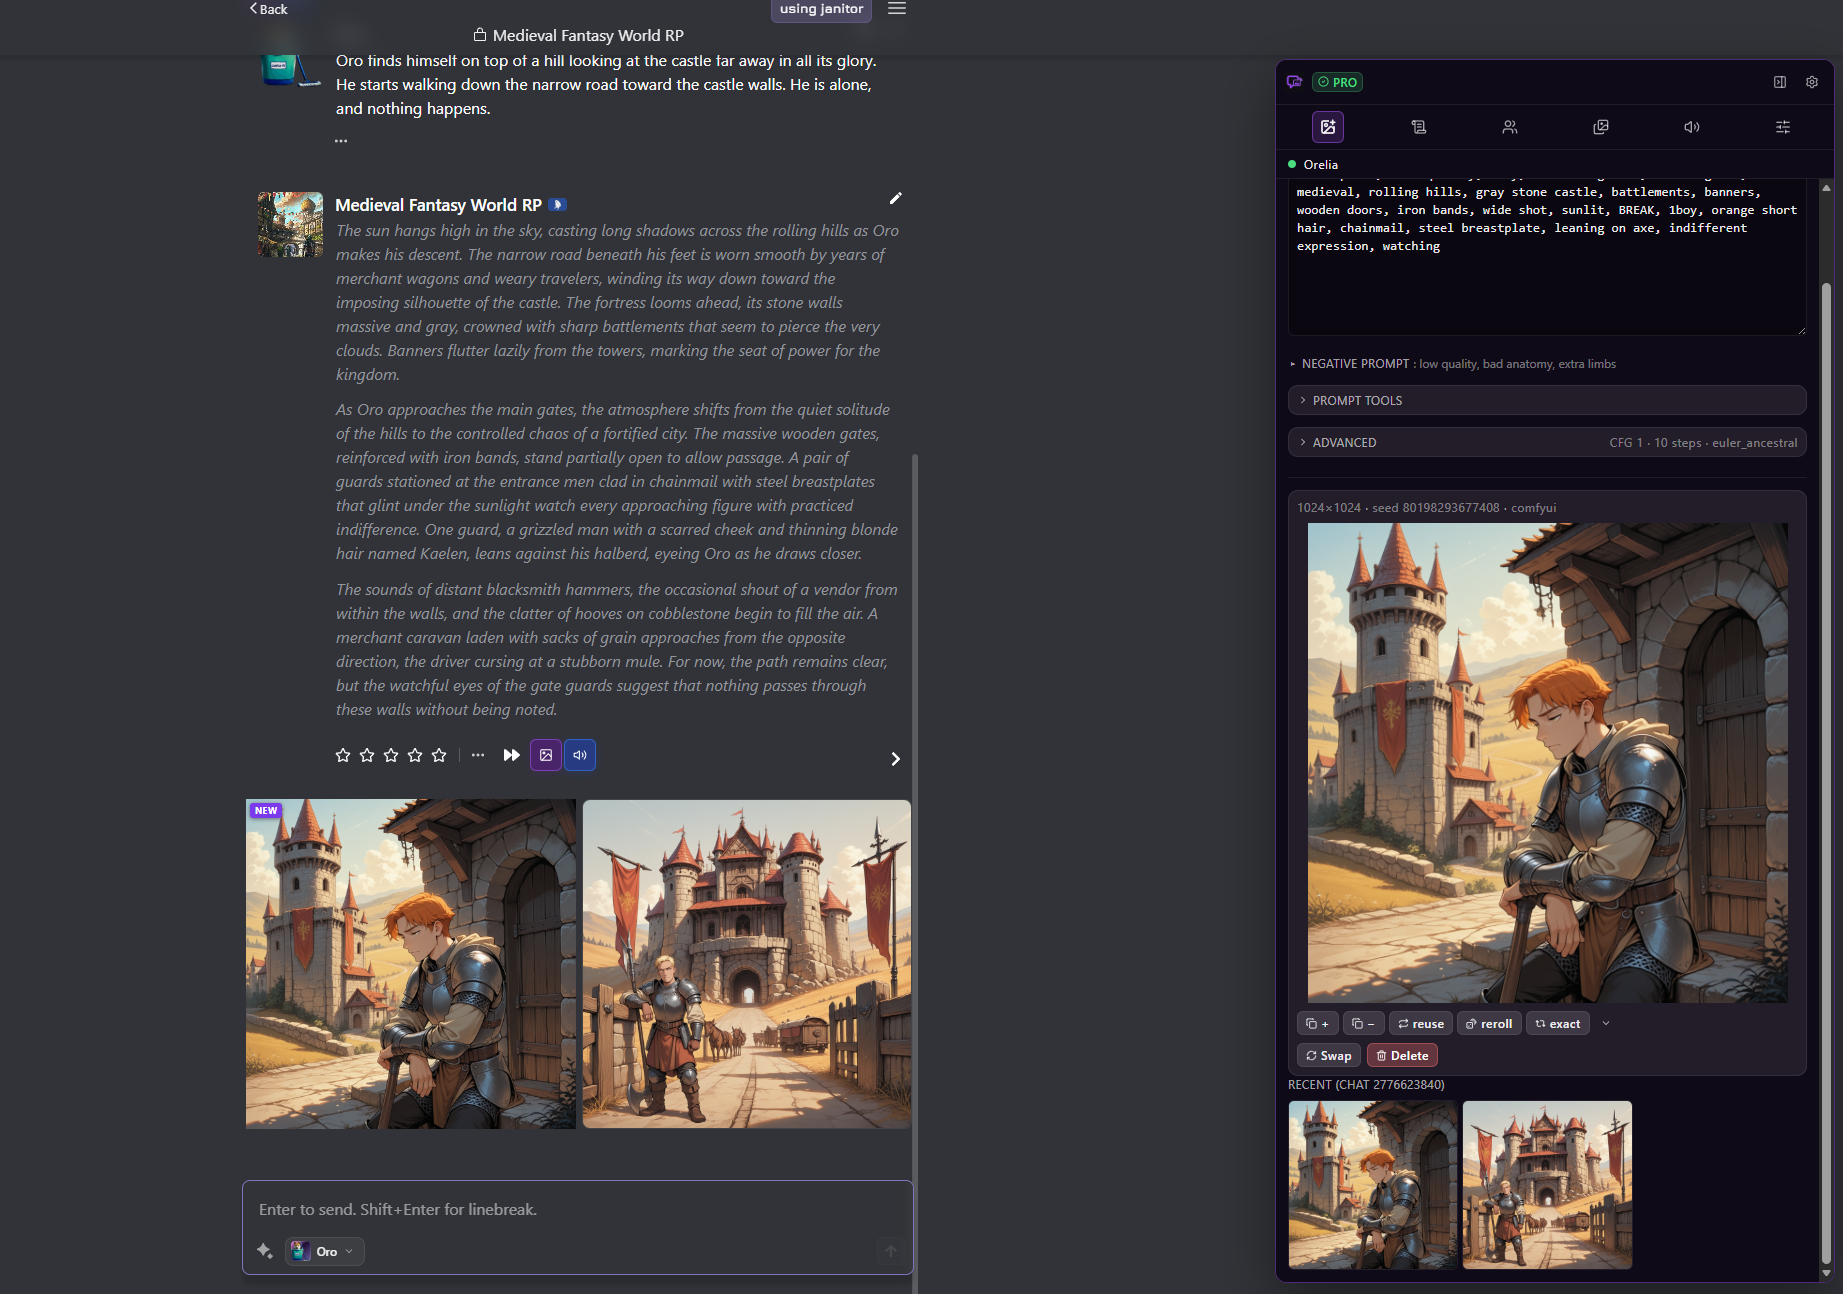
The prompt tagger converts scene and cast context into image-ready tags.
-
3
Edit anything you want.
The positive and negative prompt are yours to refine before generation.
-
4
Generate.
The selected image provider renders the result; it appears in the panel, inline in chat, and in Gallery.
What the Pin number means
An image’s Pin number identifies the bot message it belongs to. Toolkit displays that image directly below the bot message with the matching page index.
- 1If an image is missing or appears under the wrong reply, open Gallery.
- 2Find the generated image and enter the index of the target bot message in its Pin field.
- 3Select Pin. The image is moved below that message in the chat.
Changing the pin does not regenerate, duplicate, or edit the image; it only changes where the existing image is attached in the chat.
One service produces audio; one helper understands speakers
TTS provider
The speech backend—such as Kokoro, ElevenLabs, OpenAI TTS, Edge TTS, or AllTalk—that turns text into audio.
TTS helper
An LLM-powered parser that separates narration and dialogue, identifies speakers, and detects emotion.
- 1Add a TTS provider in Settings and test its credentials or endpoint.
- 2Add an LLM connection, then create a TTS helper and choose one of the connection's available models.
- 3Assign voices to cast members; configure a narration voice if you want it separated.
- 4Use the speech control on a message, or enable automatic speech if available in your plan.
Configure from the bottom of the dependency chain upward
Start with the message Toolkit is showing you
The Toolkit flag does not appear on JanitorAI
Reload the JanitorAI tab after installing or updating the extension. Confirm the extension is enabled and has permission to run on janitorai.com.
A settings card says “Setup needed”
That capability has no configured item yet. Open the card, add one, and then check Defaults if the feature needs a default selection.
“Refresh from messages” says the scene is up to date
There are no unread chat messages for the scene analyzer. To intentionally change the current scene, enter a change request and select Apply now instead.
I changed a character, but the scene still has the old appearance
Saving Cast changes does not call the LLM. Select Reconcile scene with cast, then review the updated scene.
The scene is updating and the buttons are disabled
This prevents two competing LLM updates from overwriting each other. Keep the panel open; the scene text refreshes automatically when the update finishes.
My local provider cannot be reached
Open the provider in Settings and confirm that its exact address shows “Granted”. If not, select “Allow access”. Then make sure the provider is running, the base URL and port are correct, and its browser-access or CORS settings allow the extension.
Still stuck?
Share the exact status message and the provider type in Discord so the community can help quickly.